Have you seen photos of curbless showers and admired how sleek and contemporary they look? Or maybe it’s the accessibility of an open-concept shower that piques your interest, knowing that you can age in your home without worrying about getting in and out of your shower.
If you’re looking to make this luxury upgrade in your bathroom, here is everything you need to know about curbless showers:
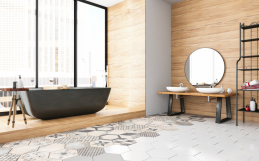
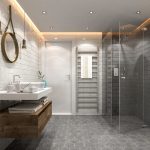
What Is A Curbless Shower?
A curbless shower, or a walk-in shower, doesn’t have a lip on the floor surrounding it. This type of shower requires a structural drop in the floor to ensure that water drains properly and stays only within your designated shower area.
Steps To Installing A Curbless Shower
The first step in planning for a curbless shower is to speak with a flooring consultant who will walk through your home to determine the specific steps that will be necessary for the project.
One of the first steps will be to adjust your floor. There are a few ways this can be done:
Recess Your Shower Floor
A recessed floor allows for the installation of a sloped mortar bed or a prefabricated shower tray that is flush with your bathroom floor. This solution is the most labour-intensive and isn’t always an option, as it will depend on the structure of your home.
2. Use A Prefabricated Shower Tray & Ramp
When recessing the floor isn’t an option, a shower tray and ramp will facilitate the transfer between the shower and bathroom floor. Installing a shower tray and ramp eliminates the need for a mortar bed, and reduces both the weight and installation time. Schluter KERDI shower trays are available in a variety of sizes and feature integrated waterproofing.
3. Raise Your Floor
When neither recessing nor using a ramp are options in your home, the third option is to raise the floor. This can be done by installing a plywood panel on the subfloor and including a Schluter Systems shower tray and uncoupling membrane on a wood floor. On a concrete floor, your installer will recommend the use of a bonded mortar bed with an appropriate thickness to build up the surrounding bathroom floor.


4. Waterproof Your Shower
Waterproofing is one of the most important parts of any shower, but even more so in walk-in where there’s no lip or curb to stop water.
At Bigelow Flooring, we only use the Schluter waterproofing system. The Schluter KERDI waterproofing membrane protects your walls, seals all seams, and protects vulnerable areas of your shower. This effectively eliminates water leakage and prevents water deposits and mould growth.

5. Place Your Shower Tile
Once the steps above are complete, your shower will be ready for tiles. When it comes to flooring choices, your options are endless. From large-format porcelain tile to vinyl, a member of our team will happily help you design the luxury bathroom of your dreams.

If you have any questions about flooring, curbless showers, or the installation process, contact the experts at Bigelow Flooring. We’re happy to help.